
Introduction:
The hydra-python-agent is a smart Hydra client implemented in Python which works with any hydra powered server. Smart clients are generic automated clients that establish resilient connected data networks leveraging knowledge graphs.
The Agent is designed to:
- Provide a seamless Client that can be used to communicate with Hydra APIs
- Cache metadata from the Hydra server it connects to, to allow querying on the client-side
- Maintain a synchronization mechanism which makes sure cached resources are consistent
- The graph can be queried using OpenCypher.
Using Hydrus APIs with the agent
The agent can be used both as a package and with a GUI to interact with the hydra powered APIs. Here Hydrus server will be used to interact with the API.
Using Agent as a package
Setting up Agent:
Clone the repository and set up a virtual environment
git clone https://github.com/HTTP-APIs/hydra-python-agent.git
cd hydra-python-agent
apt-get install python3-venv # If not installed
python3 -m venv venv
source venv/bin/activate
Install the agent by running the following commands:
pip3 install --upgrade pip
pip3 install -r requirements.txt
python3 setup.py install
Setup Redis which is used as caching layer(if permission denied use sudo):
sudo ./redis_setup.sh # <- Might be necessary to use sudo
Set up Hydrus by following the instructions here: https://github.com/HTTP-APIs/hydrus#demo.
Run hydrus serve --no-auth
Open the python REPL in the project directory by typing python3 and hitting enter.
import hydrus_agent.agent import Agent
The agent supports all four basic operations namely, create, Read, Update, and Delete or CRUD. To create, the HTTP verb used is PUT, to read, GET is used while for update POST is used, and DELETE is used to delete the resource.
A server is required to add, create, or update the resources. To connect to the Hydrus server, in the python REPL type and hit enter
agent = Agent("http://localhost:8080/serverapi")
The Agent is the factory class that returns the instance of the agent. All the CRUD operations can be invoked on this instance. If the APIDOC is not specified, Hydrus serves a default APIDOC. The default APIDOC features a flock of drones that have an objective to detect the presence of fires or abnormal heat spots in a given geographical area using sensors. For more details about the default APIDOC being used visit https://www.hydraecosystem.org/Example. Having this information in the background, see if there are any drones right now use the following command:
agent.get('https://localhost:8080/serverapi/LogEntryCollection')
An empty array is returned and rightly so because no drones were added. To add a log Entry, we issue a PUT request to the server with the drone data. In the REPL type,
agent.put("http://localhost:8080/serverapi/LogEntry", {
   "@type":"LogEntry",
   "DroneID":"5Z7T22",
   "Update":"UJM514",
   "Get":"7WQND8",
   "Send":"YCBX0R",
   "State":{
      "@type":"State",
      "Speed":"NRZ8BT",
      "Position":"JR7LIN",
      "Direction":"VMDEES",
      "Battery":"4N7HAP",
      "SensorStatus":"58AONM",
      "DroneID":"67IK42"
},
   "Data":{
      "@type":"Datastream",
      "Temperature":"C5K2KM",
      "DroneID":"Y6I8D9",
      "Position":"LKKNIR"
},
   "Command":{
      "@type":"Command",
      "DroneID":"YUFSZU",
      "State":{
         "@type":"State",
         "Speed":"CAWCP1",
         "Position":"IJ1A4Y",
         "Direction":"UOXIVX",
         "Battery":"WG1BDM",
         "SensorStatus":"RM4F1Q",
         "DroneID":"ZT9G5J"
}
}
})
Now if you GET the LogEntry Collection you will see one item on the list:
{
    "@context": "/serverapi/contexts/LogEntryCollection.jsonld",
    "@id": "/serverapi/LogEntryCollection/",
    "@type": "LogEntryCollection",
    "hydra:totalItems": 1,
    "hydra:view": {
        "@id": "/serverapi/LogEntryCollection?page=1",
        "@type": "hydra:PartialCollectionView",
        "hydra:first": "/serverapi/LogEntryCollection?page=1",
        "hydra:last": "/serverapi/LogEntryCollection?page=1"
    },
    "members": [
        {
            "@id": "/serverapi/LogEntry/7c79d71e-fa8b-47c2-b35e-9f6ca0037c2a",
            "@type": "LogEntry"
        }
    ],
    "search": {
        "@type": "hydra:IriTemplate",
        "hydra:mapping": [
            {
                "@type": "hydra:IriTemplateMapping",
                "hydra:property": "http://schema.org/identifier",
                "hydra:required": false,
                "hydra:variable": "DroneID"
            },
            ....
        ],
        "hydra:template": "/serverapi/LogEntryCollection{?DroneID, Update, Get, Send, State[Speed], State[Position], State[Direction], State[Battery], State[SensorStatus], State[DroneID], Data[Temperature], Data[DroneID], Data[Position], Command[DroneID], Command[State], pageIndex, limit, offset}",
        "hydra:variableRepresentation": "hydra:BasicRepresentation"
    }
To update the resource on the server POST operation is used. To update the required fields of the drone with the updated resource, in the REPL type:
existing_log['Get'] = "123"
agent.post("http://localhost:8080/serverapi/LogEntry/7c79d71e-fa8b-47c2-b35e-9f6ca0037c2a", existing_log)
Notice that the route contains the URL the same as @id obtained earlier. And to see if the get actually changed to “123”, in the REPL type:
agent.get("http://localhost:8080/DroneCollection", {"name":"abc"})
You should see the updated drone. To delete the drone, DELETE operation is used.
agent.delete("http://localhost:8080/serverapi/LogEntry/7c79d71e-fa8b-47c2-b35e-9f6ca0037c2a")
You will the see the response:
{
"@context": "http://www.w3.org/ns/hydra/context.jsonld",
"@type": "Status",
"description": "Object with ID 7c79d71e-fa8b-47c2-b35e-9f6ca0037c2a successfully deleted",
"statusCode": 200,
"title": "Object successfully deleted."
}
Similarly, other collections and classes can be modified using the agent.
Using the GUI
The agent also has a GUI (Graphical User Interface) that can be used to interact with Hydrus.
Setting up the GUI
Clone the repository and set up a virtual environment:
git clone https://github.com/HTTP-APIs/hydra-python-agent-gui.git
cd hydra-python-agent-gui
apt-get install python3-venv # If not installed
python3 -m venv venv
source venv/bin/activate
pip3 install -r requirements.txt
Run the Redis graph server:
sudo ./redis_setup.sh # <- Might be necessary to use sudo
Finally, run python3 app.py to launch GUI. The GUI can be used now on the http://localhost:3000/
The GUI has two sections. The Graphical interface and the console. The Graph is the graphical representation of the APIDOC. You can zoom in and out, click on any node to highlight other nodes it is connected to. It graphically represents, what are the supported operations, supported properties, what it expects, what will it return, and other related metadata.
The console is where the CRUD operations can be performed on the endpoints. The raw command shows how would the agent be used, if it was being used as a package. The output returns the output of the operation performed. For example, click on DroneCollection. The supported operations and the supported properties will appear. If GET is chosen and keeping all the property fields blank, hit the send request, you will get the empty array as output.
To add a resource, for example, a drone. choose DroneCollection, and in the properties, leave the resource id, as it would be assigned by the hydrus, and fill in rest of the properties like,
"DroneState":"active",
"Name":"abc",
"Model":"abc",
"MaxSpeed":"100",
"Sensor":"on"
Notice that here we need not provide @type like we did while using an agent as a package, as it is automatically filled in for us by the agent. Also, the resource id field is left blank intentionally. In the output field you can see the output:
[
{
"@context" :"http://www.w3.org/ns/hydra/context.jsonld",
"@type" : "Status",
"description" : "Object with ID 6aeaa6db-7a15-498f-8462-d7b2907f4281 successfully added,"
"title" : "Object successfully added",
},
"http://localhost:8080/serverapi/DroneCollection/6aeaa6db-7a15-498f-8462-d7b2907f4281",
]
The alphanumeric sequence appended after DroneCollection is the resource id. It is required to update and delete. To update the resource, chose POST operation, with the properties field having the updated properties, for eg:
DroneState:"active"
Name:"qwerty",
Model: "abc",
MaxSpeed:"100",
Sensor:"on"
On clicking the send request button, you will receive the output as :
{
"@context" :"http://www.w3.org/ns/hydra/context.jsonld",
"@type" : "Status",
"description" : "Object with ID 6aeaa6db-7a15-498f-8462-d7b2907f4281 successfully updated",
"title" : "Object updated",
}
Similarly, a particular resource can be deleted or retrieved by using the resource id.
The great part is that the agent discovered all the endpoints and which operations can be invoked on the routes, the properties to send, and what properties to expect, without having to hardcode it.
Redis as a graph database for Hydra Agent
The aim is to implement Redis as a graph database for fast querying process for the hydra client.
Graph structure
The graph structure is the important part of implementing Redis because graph structure determines how API structure and data stored in the Redis in graphical form.
Redisgraph is using to create the nodes and edges. Required data is stored in the node properties.
The graph structure is based on the endpoints of the server.
The creation of entire graph structure starts from the Hydra:Entrypoint and it considers every object (both endpoint or non-endpoint) as a node.
The graph structure has two types of endpoints:
collection_endpointclass_endpoint
Every collection endpoint contains the collections of endpoints(“members”) which stores as a node in Redis graph and the “members” of collection endpoint are stored in a dictionary(Python dict), every member contains the data that we have fetched from the server. Ex: In a DroneCollection node, label is “collection” and alias is “DroneCollection”; and properties is a dictionary(Python dict) which stores all the members for the endpoint named DroneCollection.
Hydra python core’s (hydra_python_core.doc_maker) functionality is used for seperating the endpoints(“collection” and “classes” endpoints) and finding its supportedProperty or supportedOperations and all the other things which can get from API documentation.
The graph structure have five types of nodes in graph with five different labels:
- label = “id” (it is used for Entrypoint node)
- label = “classes” (it is used for class_endpoints nodes)
- label = “collection” (it is used for collection_endpoints nodes ex- DroneCollection)
- label = “objects” (it is used for the endpoint or member of collection endpoint ex-Drone2)
- label = “object” (It is used for the non-endpoint objects ex- State or Drone State)
All the same label nodes have different alias or key which gives them identity with the group also. The Redis graph has an edge between a different label and in the same label also. Example- every classes label or collection label should have an edge with id label and every object’s label has an edge with collection label and now objects label can have an edge with object label as well as with the classes label and there is also a chance that classes label can have an edge with the classes label as well as with the object label.
Ex: Simple Diagram for the graph(how it is connected):
Lets the initial node is “Entrypoint” and “ControllerLogCollection”, “DroneLogCollection”,”DroneCollection”, “DatastreamCollection”, “CommandCollection”, “AnomalyCollection” and “MessageCollection” are the collection endpoints and “Location” is a class endpoint. “Drone2” is a member of DroneCollection endpoint and “Drone2State” is a non-endpoint object(property) of Drone2.
So, the graph is:
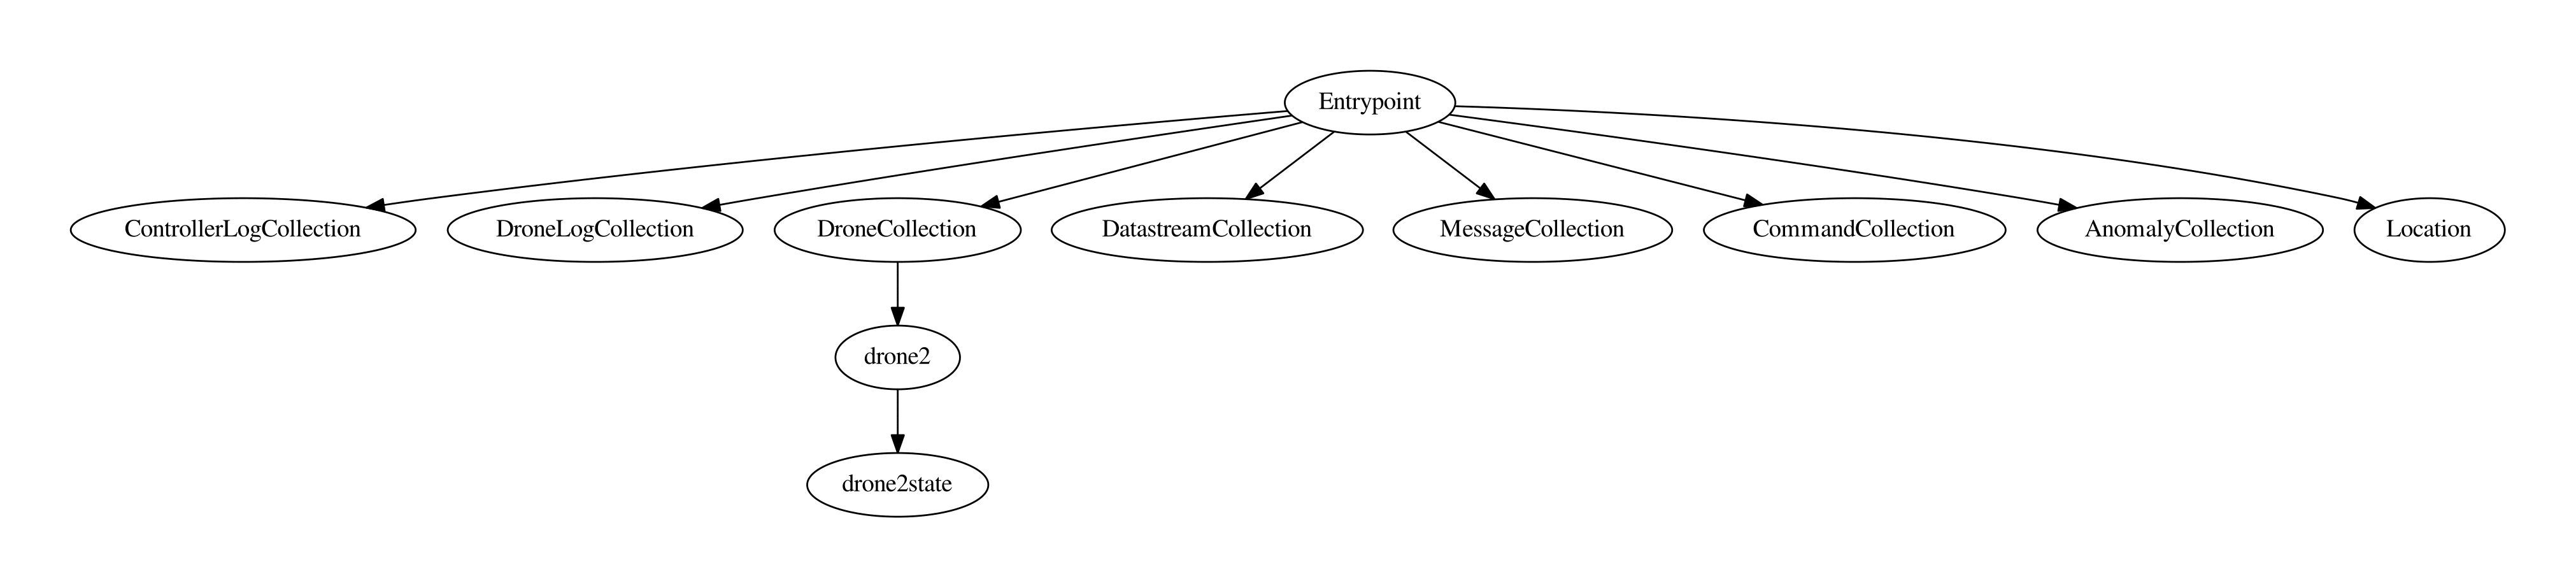
Above is an idea that how graph nodes can be connected in the graph.
Here is a documentation of graph implementation. There is a good explanation, how data and other properties are stored in the graph and how the graph is stored in Redis.
Querying Mechanism
Querying mechanism is used for retrieve the data from the Redis memory. OpenCypher is the querying language to retrieve data from the graph.
Actually here, graph is loaded by parts. At first, initial sub-graph should be load with the help of url provided by user which contains only the endpoints, class endpoints and collection endpoints in it. But if user wants to access the members of any collection or value of properties of class and collection endpoints then other part of graph should be load
Ex: At first user gives url, and initial sub-graph should be load in Redis. Now, if user query for DroneCollection members then another part of graph should be load which contains all the members and properties of members of DroneCollection endpoint.
Similarly, other parts of graph should be loaded in Redis. The user can query for that in querying format.
How to query
There are several types of queries:
- User can query for all the endpoints.
- User can query for class endpoints as well as collection endpoints seperately.
- User can query for members of any collection endpoint.
- User can query for members’s properties and also for its values of any collection endpoint. Ex: objectsDrone properties
- User can query for properties and its values of any class endpoint.
- User also can query with property and value or by comparision in properties. Ex: name Drone1 and model xyz, here name and model are properties and Drone1 and xyz are these values.
Example for the complex query(type: comparison of properties):
User should use brackets in these type of query in which both and and or operations are present, to differentiate between the and and or operations like: a and b and ((c or d or e) and f).
How agent execute query
For above first two’s, agent use the OpenCypher and simply fetch the data from the Redis because thats data has stored at the time of url given by user.
And for querying members or members’s properties, agent should get the data from the server once with the help of given url and stored it in Redis. After that it is similar to above case, use OpenCypher query to retrieve required data form Redis. And the similar thing is happen for the properties and its values of class endpoint.
But for last one type of query, agent uses some special type of indexing.
Ex: if property is “model” and its value is “xyz” for id “/api/DroneCollection/2”. then its indexing be like fs:model:xyz = /api/DroneCollection/2.
So, these type of indexing make easier to retrieve data from the Redis. Thats type of indexing also called the faceted indexing.
Faceted indexing is using here especially for a query type: comparison of properties.
Example how client execute complex query(contain combine and and or):
First, client will search for brackets and break the brackets part into partial query. Executes the partial queries and store its data in the random generated key. It a recursive process, run until all brackets over. After execution of all partial queries now query become simpler only with a type of operation. Now, client executes simple query and user gets the desired result.
query = a and b and ((c or d or e) and f)
first step => query = a and b and (c:d:e and f)
second step => query = a and b and c:d:e:f
After second step, query becomes simple and have only a type of operation and. And c:d:e and c:d:e:f are random keys for c or d or e and c:d:e and f respectively.
Faceted index
Faceted Indexing is used to handle complex queries like and and or queries or the queries which can be done only with the help of properties. Example how faceted indexing helps the agent:
Let a “DroneCollection” member /api/DroneCollection1 have properties: {name:Drone1, model:xyz, MaxSpeed:250} then agent storing these using faceted indexing like: fs:name:Drone1 = /api/DroneCollection1, fs:model:xyz = /api/DroneCollection1 and fs:MaxSpeed:250 = /api/DroneCollection1(where fs:{key}:{value} is a set which can have the many values like /api/DroneCollection1,/api/DroneCollection2…). And the same method is use for the other member’s properties.
So, now if user query for all model with value xyz then agent will return the value of set fs:model:xyz. And similarly, agent works for other these type of queries.
Synchronization Mechanism for client server updates
The synchronization between Hydrus and hydra powered agents takes place in the following manner. If the data is modified on the Hydrus, the server broadcasts all the agents in the network about the update. The agents receive this update in their ‘inbox’ by the Hydrus through a message-passing protocol. This message-passing protocol is implemented on web sockets. The agents maintain an internal state of data in the network, in the graph database, i.e. Redis. In this way, the agents can keep track of the changes in Hydrus.
The server has an outbox table. The table contains columns like job_id, method, and resourceURL. The agent keeps track of modifications to make using the last updated job_id.
| JOB_ID | METHOD | RESOURCE_URL |
| fece6d5e…. | POST | http://server.com/Collection/98e8e272-e5ae-4f1a-a0b2-117fb052ca50 |
| aaa49974... | DELETE | http://server.com/Collection/f1404e8d-0a52-4359-88c3-29ec9f208525 |
When modifications are done on hydrus, which can be done by any one of the agents, hydrus simply emits an event saying, there’s an update. Agents after being informed, query the endpoint ‘/modification_table_diff’ to fetch new rows. They send hydrus the last job id they had processed i.e fece6d5e in this case, and will get all the new rows above fece6d5e and process them. After that, the agent will update its last_job_id variable with the new last_job_id on the server.
Implementation
HYDRUS
Hydrus implements the mechanism using these components:
- A socket connection that broadcasts that there were new events to all agents.
- The limited size table that should contain modifications made to resources.
- An endpoint for the agents to fetch the modifications table difference: ‘/modification-table-diff’
This ‘/modification-table-diff’ takes in a parameter with a Job ID and sends the table diff according to the last updated resource the Agent had.
GET Example: https://localhost:5000/modification-table-diff?agent_job_id=2
(If empty parameter, the endpoint returns the full table(For initialization purposes))
Only POST and DELETE operations are tracked as they are the only ones that can lead to integrity issues. GET requests from other clients do not change the server state and PUT requests are new resources that the Client hasn’t queried yet, so they aren’t yet cached and thus ignored.
AGENT
The agent when connecting for the first time, through web sockets, copy the table to their internal state. There are three situations that have to be addressed when dealing with new rows at the modification table:
- The agent has internally an outdated resource that needs an update.
- The agent never queried that resource.
- The agent was the one who made a transaction.
The agent finds a JOB ID referring to an outdated resource
The agent finds a new JOB ID, it queries it’s Redis graph to check if it already has that specific resource if finding it, it will compare both the internal resource date and the one provided by the server. If the resource provided by the server is more recent, it will call itself internally to query that resource again from the hydrus server and update it internally accordingly.
The agent finds a JOB ID to a nonexisting resource internally
The agent finds a new JOB ID, it queries its Redis graph to check if it already has that specific resource, if not finding, meaning that the agent hasn’t yet queried for that resource, the agent can ignore the modification and simply add the row to its internal table since it’s not relevant for the agent.
The agent finds a JOB ID made by itself on the table
When the agent finds a new job that isn’t on its table, the first thing it has to do is to check if its internal resource has a Date signature after or similar to the one in the server table, if the internal agent representation is more recent, basically the agent adds that transaction to the table since the agent has a more up to date resource that will be shown soon at the server table.